🪵Logging on NestJS like a Pro with Correlation IDs, Log Aggregation, Winston, Morgan and more
date
Nov 10, 2023
slug
logging-on-nestjs-like-a-pro-with-correlation-ids-log-aggregation-winston-morgan-and-more
status
Published
tags
Chia sẻ
Sưu tầm
Study
NestJs
JavaScript
summary
Implementing a full production-ready Logger System for NestJS Microservices or Monolithic Apps in a Clean Architecture.
type
Post
Implementing a full production-ready Logger system for NestJS Microservices or Monolithic Apps in a Clean Architecture.

In that article, I will share only the most important parts of the implementation. The complete code is published in a public Github Repository. PRs and a Star if that is helpful for you are welcome!
GitHub - jnm733/nestjs-logger: NestJS Full Logger integration example with Winston and MorganNestJS Full Logger integration example with Winston and Morgan - GitHub - jnm733/nestjs-logger: NestJS Full Logger…
github.com
Logging is, probably, the most important aspect of Software Observability.
It’s the manner that our code has to talk with us. By logs, our code tells us if There have been errors during this night, if a group of operations is starting to take too much time, or how many requests we had served during the last Black Friday.
Implementing a Logger system on a basic project is very easy, we just need to fill our code with some console.log(), System.out.println() or println(), but when we are on advanced and distributed systems like Microservices or Enterprise Monolithic Apps, there are concepts that we need to consider in order to achieve a really production-ready Logger system that provides value to us when we need it.
In the next article, we will implement a production-ready Logger system for NestJS Apps. Even so, we will comment aspects agnostic to the technology like Log aggregation, Correlation IDs, Log Levels, etc., so I encourage you to stay here even if you don’t use NestJS.
Project Structure
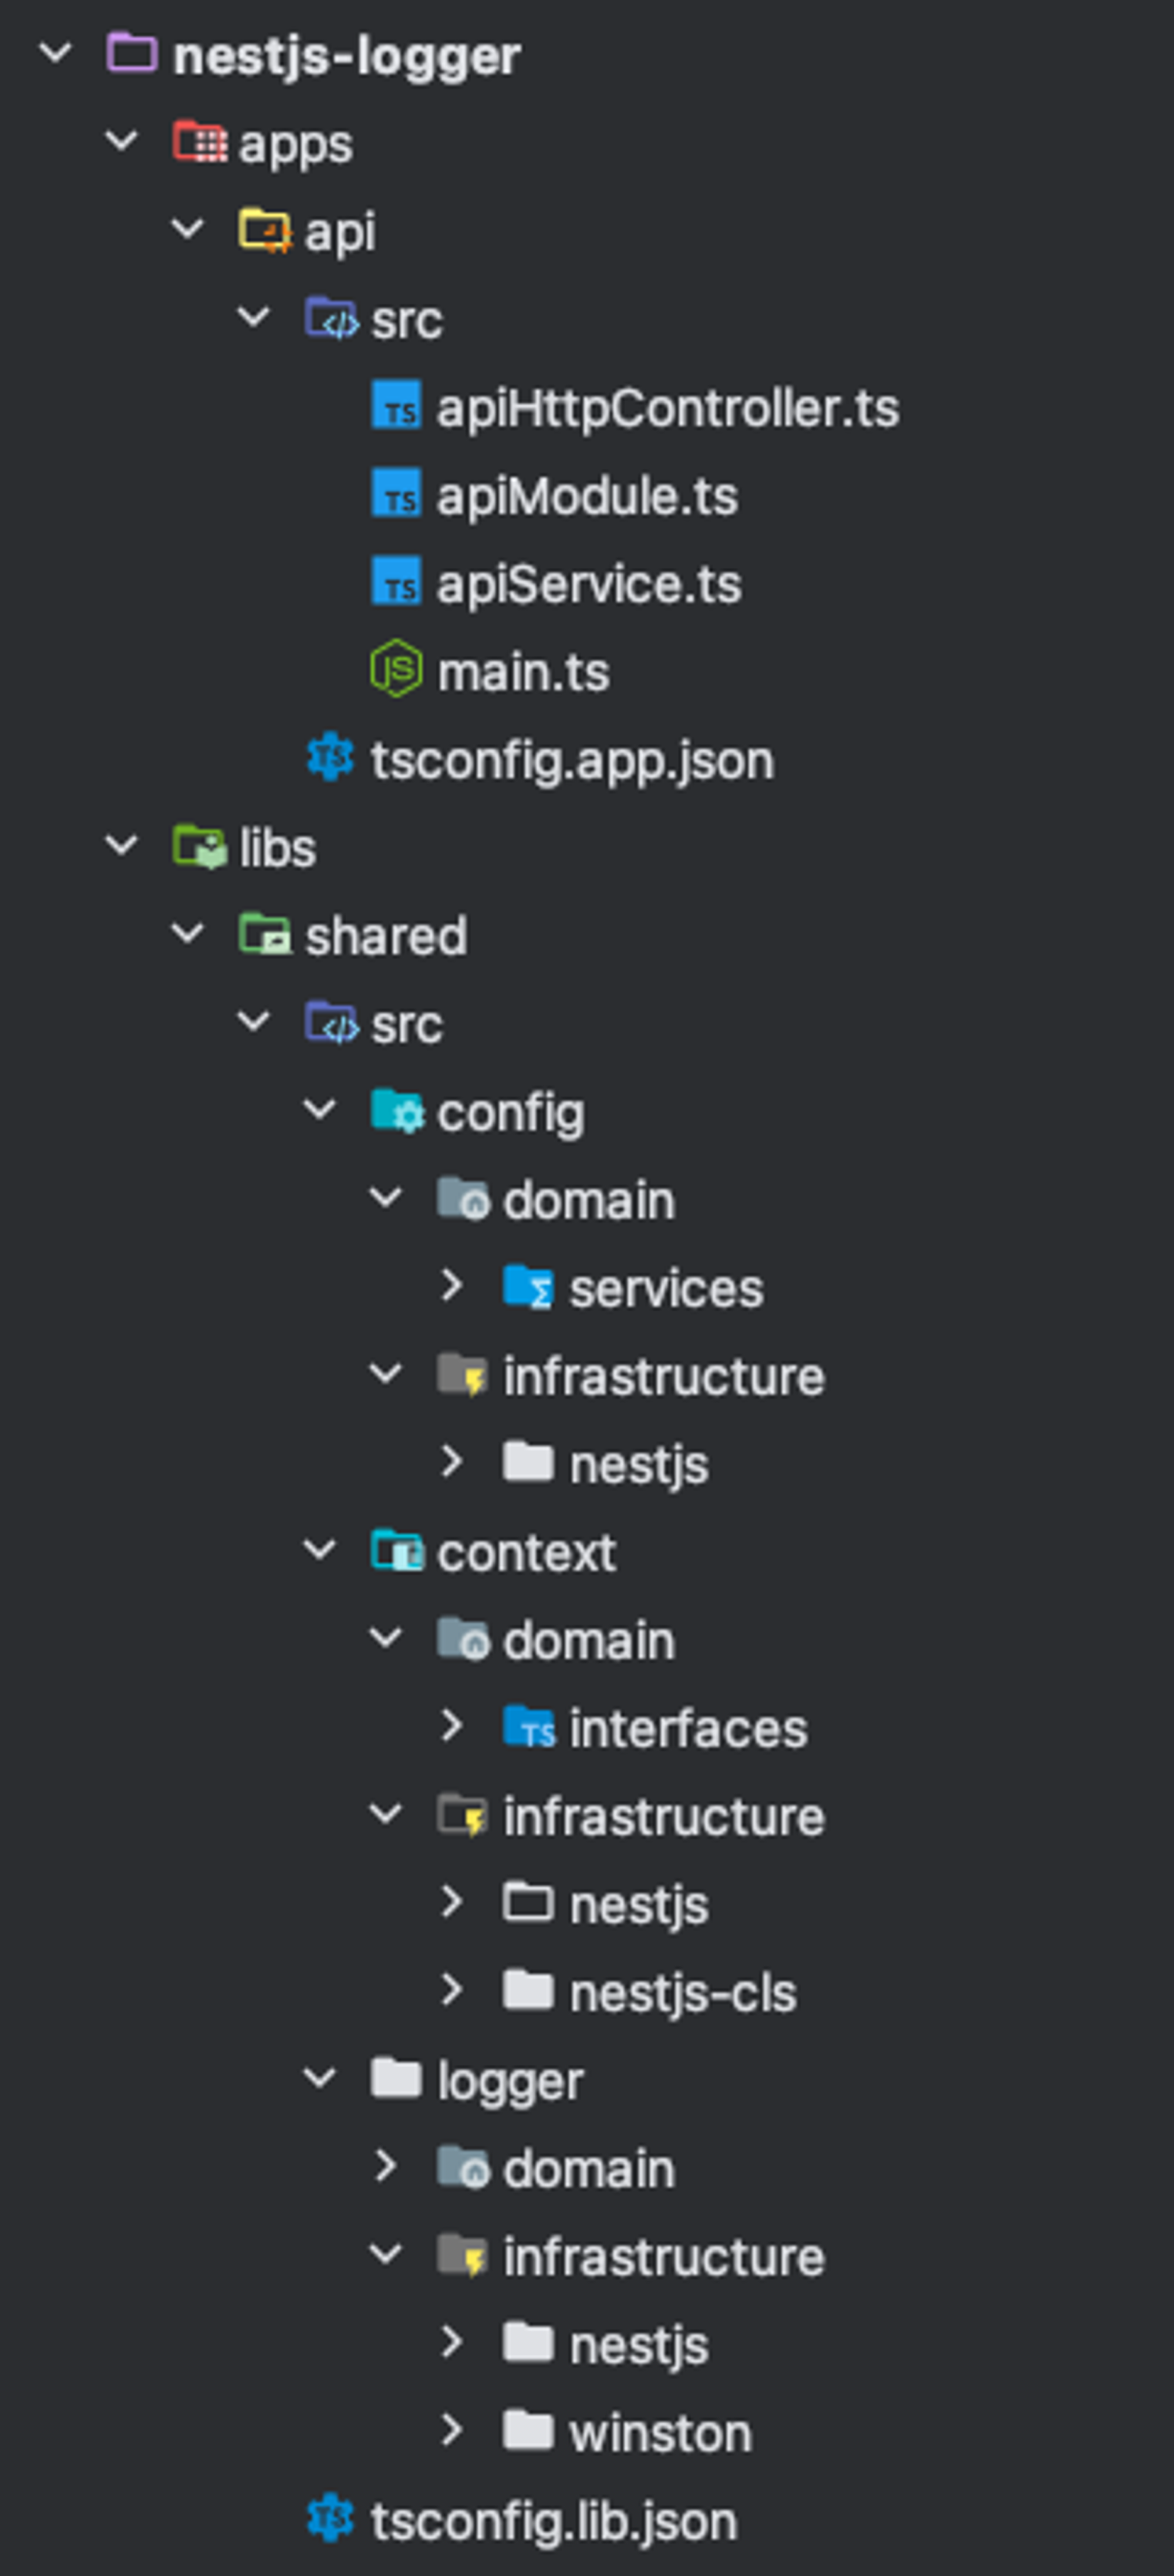
On that project, we will use a NestJS Monorepo to decouple our apps (apps folder) from our core code (libs folder). In a DDD context, all concepts that we will see in that article would belong to the Shared Kernel, so we will define a shared package in our libs folder that is composed of different Modules. These are Config, Context and Logger. Every module follows an Hexagonal Architecture so we will find a Domain, Application and Infrastructure folders on every Module. If you don’t know it, I encourage you to search for information about it.
To test our implementation, we will use a NestJS API that is in the apps folder.

Project Structure
Saying goodbye to console.log()
Let’s admit it, all of us have filled a project with thousands of console.log(), console.warn() or console.error().
This is no problem for a personal or small project, but when we are on professional systems, that solution can end up being a nightmare.
What happens if our project has grown so much that we need to outsource the logs management? We need to now go over all our code console.log() to replace it?
Furthermore, we should remember that the console.log() function is synchronous and locks the Node.js Event Loop, so on high concurrence systems that can be a problem.
This is why we need to use a more advanced Logging system. But calm down, we have some big popular libraries in the Node.js ecosystem that do the hard work for us, like Winston, Pino, Morgan or Bunyan.
In that implementation, we will use Winston and Morgan, but following a Clean Architecture we will decouple our domain core from these external decisions, so you can change it in the future.
Defining our Log Levels
When we talk about logs, is very common to talk about levels. We need levels to classify every log in order to know if we need a programmer to get out of bed urgently or if it is just a log for debug purposes. I find enough for almost all projects the next levels, but you can add, remove or modify what you want.
export enum LogLevel {
  Emergency = 'emergency', // One or more systems are unusable.
  Fatal = 'fatal', // A person must take an action immediately
  Error = 'error', // Error events are likely to cause problems
  Warn = 'warn', // Warning events might cause problems in the future and deserve eyes
  Info = 'info', // Routine information, such as ongoing status or performance
  Debug = 'debug', // Debug or trace information
}
Decoupling Logging library
On a Clean Architecture, we have forbidden filling out our code with third-party library calls, so we will decouple the specific Logging library with an abstraction.
We start by defining our core Logger abstraction:
import { LogData, LogLevel } from '@nestjs-logger/shared/logger/domain/log';

export const LoggerBaseKey = Symbol();
export const LoggerKey = Symbol();

export default interface Logger {
  log(
    level: LogLevel,
    message: string | Error,
    data?: LogData,
    profile?: string,
  ): void;
  debug(message: string, data?: LogData, profile?: string): void;
  info(message: string, data?: LogData, profile?: string): void;
  warn(message: string | Error, data?: LogData, profile?: string): void;
  error(message: string | Error, data?: LogData, profile?: string): void;
  fatal(message: string | Error, data?: LogData, profile?: string): void;
  emergency(message: string | Error, data?: LogData, profile?: string): void;
  startProfile(id: string): void;
}
When we now need to log anything, we just need to inject our Logger implementation and call our corresponding custom method.
@Injectable()
export class ApiService {
  constructor(@Inject(LoggerKey) private logger: Logger) {}

  async getHello(): Promise<string> {
    // Info
    this.logger.info('I am an info message!', {
      props: {
        foo: 'bar',
        baz: 'qux',
      },
    });

    return 'Hello World!';
  }
}
Implementing Winston
We will use Winston to manage our logs. Winston has been, for many years, a consecrated tool to manage logs on Node.js apps with about 11 million of weekly downloads on NPM.
Then, the next step that we have to do is implement our abstraction calling to Winston methods:
export default class WinstonLogger implements Logger {
  private logger: winston.Logger;

  public constructor(
    @Inject(WinstonLoggerTransportsKey) transports: winston.transport[],
  ) {
    // Create winston logger
    this.logger = winston.createLogger(this.getLoggerFormatOptions(transports));
  }

  private getLoggerFormatOptions(transports: winston.transport[]) {
    // Setting log levels for winston
    const levels: any = {};
    let cont = 0;
    Object.values(LogLevel).forEach((level) => {
      levels[level] = cont;
      cont++;
    });

    return {
      level: LogLevel.Debug,
      levels: levels,
      format: winston.format.combine(
        // Add timestamp and format the date
        winston.format.timestamp({
          format: 'DD/MM/YYYY, HH:mm:ss',
        }),
        // Errors will be logged with stack trace
        winston.format.errors({ stack: true }),
        // Add custom Log fields to the log
        winston.format((info, opts) => {
          // Info contains an Error property
          if (info.error && info.error instanceof Error) {
            info.stack = info.error.stack;
            info.error = undefined;
          }

          info.label = `${info.organization}.${info.context}.${info.app}`;

          return info;
        })(),
        // Add custom fields to the data property
        winston.format.metadata({
          key: 'data',
          fillExcept: ['timestamp', 'level', 'message'],
        }),
        // Format the log as JSON
        winston.format.json(),
      ),
      transports: transports,
      exceptionHandlers: transports,
      rejectionHandlers: transports,
    };
  }

  public log(
    level: LogLevel,
    message: string | Error,
    data?: LogData,
    profile?: string,
  ) {
    const logData = {
      level: level,
      message: message instanceof Error ? message.message : message,
      error: message instanceof Error ? message : undefined,
      ...data,
    };

    if (profile) {
      this.logger.profile(profile, logData);
    } else {
      this.logger.log(logData);
    }
  }

  public debug(message: string, data?: LogData, profile?: string) {
    this.log(LogLevel.Debug, message, data, profile);
  }

  public info(message: string, data?: LogData, profile?: string) {
    this.log(LogLevel.Info, message, data, profile);
  }

  public warn(message: string | Error, data?: LogData, profile?: string) {
    this.log(LogLevel.Warn, message, data, profile);
  }

  public error(message: string | Error, data?: LogData, profile?: string) {
    this.log(LogLevel.Error, message, data, profile);
  }

  public fatal(message: string | Error, data?: LogData, profile?: string) {
    this.log(LogLevel.Fatal, message, data, profile);
  }

  public emergency(message: string | Error, data?: LogData, profile?: string) {
    this.log(LogLevel.Emergency, message, data, profile);
  }

  public startProfile(id: string) {
    this.logger.profile(id);
  }
}
If in the future we want to replace Winston by Pino for example, we only need to set the Pino Logger interface implementation and replace it on our Dependency Injector.
Winston uses the concept of Transport to define every storage method that every one of our logs will use. In that implementation, we will print logs by console, store them on file system with a daily rotation and send a message to a Slack Channel when log levels are Fatal or Emergency. All transports are managed through a provider on the LoggerModule. If we want to add more or remove any we just need to add or remove them from the NestJS Module without changing the Winston Logger implementation. We have many others Transport implementations depending on our use case like Google BigQuery, Datadog or Amazon CloudWatch.
Improve Observability by Logging requests
With the actual implementation, we can log manually what we want through our code. However, for Observability tasks, it is very helpful to track all our served requests with information like the response time or status code to detect possible problems.
This can be laborious to implement, but luckily, we have an excellent library that implements it in the form of Middleware. That is Morgan, a very popular library for logging HTTP requests on Express.js apps.
In our case, we need Morgan to get our logs through our Logger implementation. For that, we need a special configuration that we set on the NestJS LoggerModule.
export class LoggerModule implements NestModule {
  public constructor(
    @Inject(LoggerKey) private logger: Logger,
    private configService: ConfigService,
  ) {}

  public configure(consumer: MiddlewareConsumer): void {
    consumer
      .apply(
        morgan(this.configService.isProduction ? 'combined' : 'dev', {
          stream: {
            write: (message: string) => {
              this.logger.debug(message, {
                sourceClass: 'RequestLogger',
              });
            },
          },
        }),
      )
      .forRoutes('*');
  }
}
Now all our requests will be logged automatically respecting our defined logger formats and transports.
NestJS fully integrated
For the moment, our implementation is agnostic to the NestJS framework and we can use it on any Node.js project with Typescript. Therefore, we need an extra setup to integrate it 100% with NestJS.
NestJS uses a custom Logger interface to manage bootstrapping and internal logging, hence we need to implement an Adapter to adapt our Domain Logger Interface to the NestJS.
import { ConsoleLogger } from '@nestjs/common';
import Logger from '@nestjs-logger/shared/logger/domain/logger';
import { LoggerService } from '@nestjs/common/services/logger.service';

export default class NestjsLoggerServiceAdapter
  extends ConsoleLogger
  implements LoggerService
{
  public constructor(private logger: Logger) {
    super();
  }

  public log(message: any, ...optionalParams: any[]) {
    return this.logger.info(message, this.getLogData(optionalParams));
  }

  public error(message: any, ...optionalParams: any[]) {
    return this.logger.error(message, this.getLogData(optionalParams));
  }

  public warn(message: any, ...optionalParams: any[]) {
    return this.logger.warn(message, this.getLogData(optionalParams));
  }

  public debug(message: any, ...optionalParams: any[]) {
    return this.logger.debug(message, this.getLogData(optionalParams));
  }

  public verbose(message: any, ...optionalParams: any[]) {
    return this.logger.info(message, this.getLogData(optionalParams));
  }

  private getLogData(...optionalParams: any[]) {
    return {
      sourceClass: optionalParams[0] ? optionalParams[0] : undefined,
    };
  }
}
Finally, we need to specify which logger we want to use in the NestJS APP definition (our main.ts). In addition, if we pass a custom logger, we need to set the ‘bufferLogs’ parameter to true in order for NestJS to buffer the bootstrap logs until our logger is initialized.
import { NestFactory } from '@nestjs/core';
import { ApiModule } from './api.module';
import NestjsLoggerServiceAdapter from '@nestjs-logger/shared/logger/infrastructure/nestjs/nestjsLoggerServiceAdapter';

async function bootstrap() {
  const app = await NestFactory.create(ApiModule, {
    bufferLogs: true,
  });

  app.useLogger(app.get(NestjsLoggerServiceAdapter));

  await app.listen(3000);
}
bootstrap();
Tracking our requests with Correlation IDs
Though this is important on Monolithic Apps too, when we are on distributed systems, the use of Correlation IDs on our logging system is almost mandatory.
Correlation IDs are the way that we have to correlate all logs that have originated from the same transaction and improve its tracking.
Imagine that we have an e-commerce system and when a user does an order, there are some services (Orders, Payments, Users, Catalog, etc.) that execute them process synchronously or asynchronously. As it is obvious, every service will generate a specific chain of logs. If we don’t have a way to correlate these logs, our chain is broken and the process to detect possible causes of errors or bottlenecks will be very difficult if not impossible.
To implement Correlation IDs, we need a way to assign a unique ID (we will use UUID) to every request. That ID will be maintained during the request’s lifecycle. Also, if we come back to the example of doing an order, the Correlation ID originated on the Orders Service will be propagated to the Payments Service, so we need a way to propagate IDs through our systems. We will need to read that ID from an HTTP Header, Queue Message metadata, etc. and assign it to the current request.
Fortunately, we have an incredible library that will manage that for us. That is NestJS CLS, which is an integration for NestJS of the Node’s AsyncLocalStorage, which is a Node API that allows us to create stores that are maintained through an asynchronous operation’s lifecycle. We will use that to manage IDs over requests, but there are many other utility use cases, like sharing user auth data (role, level, etc.) over all classes without passing it through parameters or managing ORM transaction objects without breaking the encapsulation and isolation of our repository classes.
To abstract all these possible cases and decouple the external library from our Core Domain, we will create again our core interface of a ContextStorageService that will be implemented in the next step with the NestJS CLS library.
export const ContextStorageServiceKey = Symbol();

export default interface ContextStorageService {
  setContextId(contextId: string): void;
  getContextId(): string;
  get<T>(key: string): T | undefined;
  set<T>(key: string, value: T): void;
}
Now we implement our interface.
import ContextStorageService from '@nestjs-logger/shared/context/domain/interfaces/contextStorageService';
import { CLS_ID, ClsService } from 'nestjs-cls';
import { Injectable } from '@nestjs/common';

@Injectable()
export default class NestjsClsContextStorageService
  implements ContextStorageService
{
  constructor(private readonly cls: ClsService) {}

  public get<T>(key: string): T | undefined {
    return this.cls.get(key);
  }

  public setContextId(id: string) {
    this.cls.set(CLS_ID, id);
  }

  public getContextId(): string | undefined {
    return this.cls.getId();
  }

  public set<T>(key: string, value: T): void {
    this.cls.set(key, value);
  }
}
Finally, we initialize the ClsModule of the NestJS CLS Library which mounts for us a middleware that manages our storage. On that, we set how we will define those IDs when they come in request headers.
@Global()
@Module({
  imports: [
    ClsModule.forRoot({
      global: true,
      middleware: {
        mount: true,
        generateId: true,
        idGenerator: (req: Request) => req.headers['x-correlation-id'] ?? v4(),
      },
    }),
  ],
  controllers: [],
  providers: [
    {
      provide: ContextStorageServiceKey,
      useClass: NestjsClsContextStorageService,
    },
  ],
  exports: [ContextStorageServiceKey],
})
export class ContextModule {}
Getting Log Aggregation with Log Format
When we are on Distributed Systems it is usual to have logs from many and varied systems. We need to tag these logs in order to know in a next step when we unify all our system logs which logs are emitting a specific Microservice or from what organization, project or team they are. This is what we call as Log Aggregation and to get it we need to format our logs with specific fields and not just a message string.
export interface LogData {
  organization?: string; // Organization or project name
  context?: string; // Bounded Context name
  app?: string; // Application or Microservice name
  sourceClass?: string; // Classname of the source
  correlationId?: string; // Correlation ID
  error?: Error; // Error object
  props?: NodeJS.Dict<any>; // Additional custom properties
}
However, set all these fields on every log call would be a nightmare. To manage these we will create a Service wrapper that will set all that data and will remain if we change Winston in the future for another library.
For debug purposes, it is very useful to know which class emits the log. To set that automatically, we will use a NestJS transient injection scope. The rest of the fields will be globals and can be set in the configuration.
@Injectable({ scope: Scope.TRANSIENT })
export default class LoggerDomainService implements Logger {
  private sourceClass: string;
  private organization: string;
  private context: string;
  private app: string;

  public constructor(
    @Inject(LoggerBaseKey) private logger: Logger,
    configService: ConfigService,
    @Inject(INQUIRER) parentClass: object,
    @Inject(ContextStorageServiceKey)
    private contextStorageService: ContextStorageService,
  ) {
    // Set the source class from the parent class
    this.sourceClass = parentClass?.constructor?.name;

    // Set the organization, context and app from the environment variables
    this.organization = configService.get<string>('ORGANIZATION');
    this.context = configService.get<string>('CONTEXT');
    this.app = configService.get<string>('APP');
  }

  public log(
    level: LogLevel,
    message: string | Error,
    data?: LogData,
    profile?: string,
  ) {
    return this.logger.log(level, message, this.getLogData(data), profile);
  }

  public debug(message: string, data?: LogData, profile?: string) {
    return this.logger.debug(message, this.getLogData(data), profile);
  }

  public info(message: string, data?: LogData, profile?: string) {
    return this.logger.info(message, this.getLogData(data), profile);
  }

  public warn(message: string | Error, data?: LogData, profile?: string) {
    return this.logger.warn(message, this.getLogData(data), profile);
  }

  public error(message: string | Error, data?: LogData, profile?: string) {
    return this.logger.error(message, this.getLogData(data), profile);
  }

  public fatal(message: string | Error, data?: LogData, profile?: string) {
    return this.logger.fatal(message, this.getLogData(data), profile);
  }

  public emergency(message: string | Error, data?: LogData, profile?: string) {
    return this.logger.emergency(message, this.getLogData(data), profile);
  }

  private getLogData(data?: LogData): LogData {
    return {
      ...data,
      organization: data?.organization || this.organization,
      context: data?.context || this.context,
      app: data?.app || this.app,
      sourceClass: data?.sourceClass || this.sourceClass,
      correlationId:
        data?.correlationId || this.contextStorageService.getContextId(),
    };
  }

  public startProfile(id: string) {
    this.logger.startProfile(id);
  }
}
To this data, we will add the common log fields to form our complete log format.
export interface Log {
  timestamp: number; // Unix timestamp
  level: LogLevel; // Log level
  message: string; // Log message
  data: LogData; // Log data
}
Knowing that we have a defined format for our logs, we can use the structure (JSON, strings, XML, etc.) that we want and we will have these fields to do the Log Aggregation on our infrastructure system (Google Cloud Logging, Logstash, AWS CloudWatch, etc.)
Testing our Logger system
We have implemented a NestJS API to test our Logger implementation. It’s a very simple API that only has a single endpoint that we can test calling to http://localhost:3000/
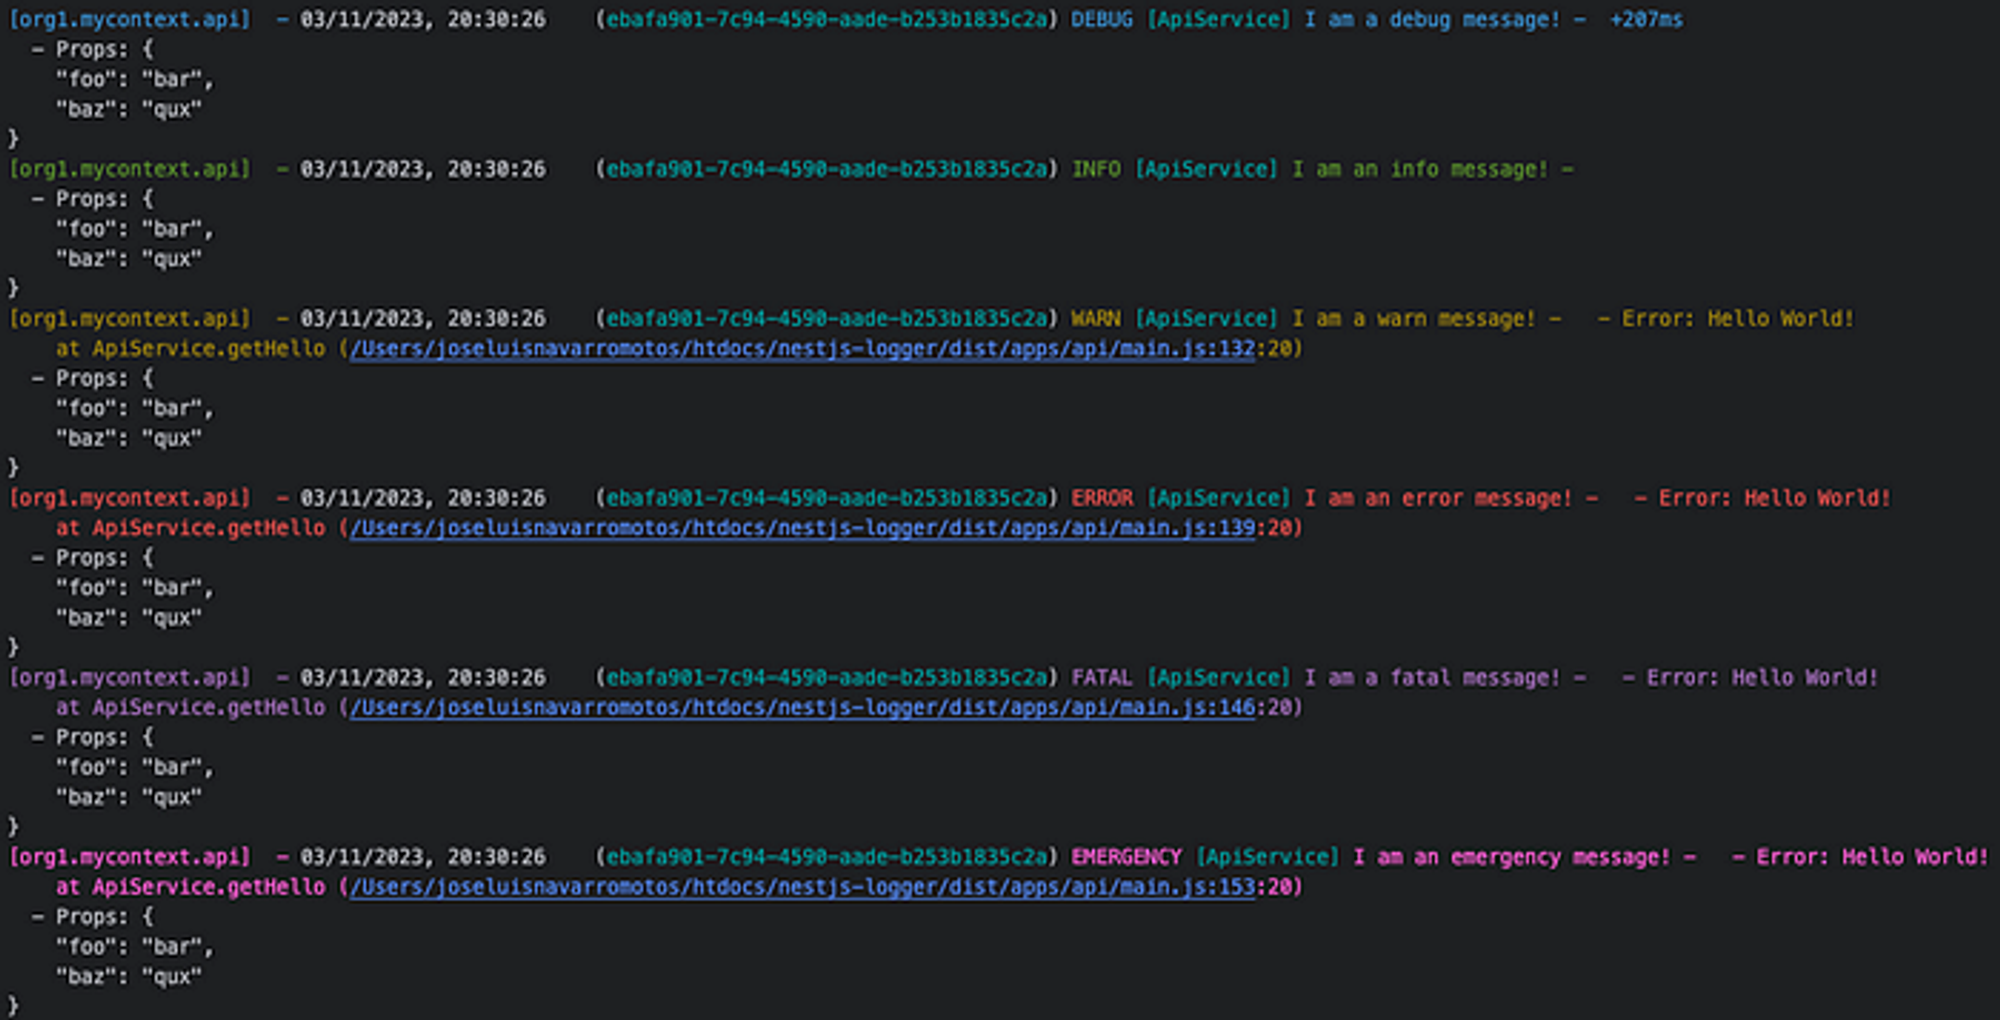
On that endpoint, we emit a log for every level. If we see our console, we will see our logs in a colorized format that we have defined on our console transport.

Our logs on the console with a colorize format
We can see almost our request log emitted from Morgan and that has useful information like response codes and times.

Request Log with response code and time
In addition to the console transport, we should see a new folder on the root project directory called logs that contains our logs on files that are rotated daily, like we had configured on our Winston file transport.

Logs on our filesystem
If we set a valid Slack Webhook URL in our .env config file, we will see that our Fatal and Emergency logs will be sent to our Slack Channel.
Finally, we will test our Correlation ID implementation by sending it on the request with the corresponding HTTP Header.
curl --location 'http://localhost:3000' \
--header 'X-Correlation-Id: example-correlation-id'
We must now see that the Correlation ID on our console and file logs is the same as what we have sent.

Our log with sended Correlation ID
Conclusions
In that article, we have implemented a full production-ready Logger System with Winston, Morgan and NestJS CLS that implements a basic Logging setup and more advanced concepts like Log Format, Log Aggregation or Correlation IDs. All this is done in a clean manner with a Hexagonal Architecture and a NestJS Monorepo.
I hope you find it useful and that it can help you in your daily work. A follow, comment and/or clap are very motivating.
In next series we will be implementing on NestJS another advanced Patterns and Architectures.

